UEFI BIOS Update with a Raspberry Pi: Unterschied zwischen den Versionen
Jal2 (Diskussion | Beiträge) Keine Bearbeitungszusammenfassung |
Jal2 (Diskussion | Beiträge) CS# of the other SPI flash may need to be tied to 3,3V. |
||
| Zeile 69: | Zeile 69: | ||
CS# (Pin 1 for the W25Q32BV, goes to CS0# on the Raspberry Pi), SO (Pin 2, MISO on RaspberryPi), GND (Pin 4), SI (Pin5, MOSI on Raspberry Pi), | CS# (Pin 1 for the W25Q32BV, goes to CS0# on the Raspberry Pi), SO (Pin 2, MISO on RaspberryPi), GND (Pin 4), SI (Pin5, MOSI on Raspberry Pi), | ||
SCLK (Pin 6) and Vcc (Pin 8, 3.3V on RaspberryPi, connect before RaspberryPi is powered on!). | SCLK (Pin 6) and Vcc (Pin 8, 3.3V on RaspberryPi, connect before RaspberryPi is powered on!). | ||
In case your notebook has two SPI flashs it may be necessary to connect CS# pin of the other flash to 3.3V from the RaspberryPi. | |||
Double-check the connections. | Double-check the connections. | ||
Version vom 21. Juni 2017, 18:30 Uhr
This page describes how to recover one of the Lenovo Thinkpads with UEFI BIOS from a bad BIOS flash. I did this with a Edge S430, which was in a state where I could switch it on and off, heard the fan spin, but the screen was off.
It seems like for the T420 the .FL1 file is not an UEFI capsule, so the procedure to extract the BIOS part below and write it to flash won't work for all models with UEFI BIOS.
Hardware Requisites
- Raspberry Pi with a Linux distribution installed, e.g. Raspian
- Pomona adapter matching the SPI flash IC case, in most cases SO-IC8. Don't use the cheaper, black ones. Their quality is rather poor.
- some jumper wires (female/female) to connect the adapter with the RaspPi pins. The length depend on the location of the SPI chip on the system board, don't buy the shortest ones. You must be able to place the RaspberryPi beside the system board and connect the Pomona adapter at the flash IC to it.
- a Linux PC
Software Requisites
- flashrom tool on the Raspberry Pi
- UEFITool on the Linux PC
- wine on the Linux PC
- the BIOS Update Utility for Windows by Lenovo for the target notebook
Install flashrom on the Raspberry Pi
You may need to install the packages libpci-dev and libusb-dev first.
- svn checkout svn://flashrom.org/flashrom/tags/0.9.8
- cd 0.9.8
- make
- sudo make install
This shall install flashrom into /usr/local/bin
Get the BIOS binary image from the BIOS Update Utility
- unpack the Windows BIOS Update package on the Linux PC, e.g. by executing it with wine:
wine gauj19us.exe
Don't let it execute the installed tool (it will fail anyway).
- You will find the unpacked components under .wine/drive_c/DRIVERS/FLASH/...
Look for a file with the extension .FL1. This is the UEFI encapsule. Rename it into a file with the extension .BIN, e.g. UEFI.BIN.
- Run the UEFITool and open UEFI.BIN. It shall display it as an UEFI capsule
- Look for the component with the UUID F33E... and save its body in another file(press Ctrl+Shift+E), e.g. UEFI_F33E.BIN.
- Open UEFI_F33E.BIN in the UEFITool again. This should be called an Intel Flash Image.
- Go to the BIOS part and write down the size of it (displayed in the right region).
- Extract the BIOS part into another file, e.g. BIOS.BIN (with "Extract as it is, Ctrl-E).
- Check the length of BIOS.BIN - if it longer than the size noted above, you must truncate it, e.g. with dd.
Find the SPI Flash on the Systemboard
Disassemble the Thinkpad according to the Hardware Maintenance Manual (HMM) until you have extracted the system board. Try to locate the SPI flash. My S430 has two of them. The bigger one (8MByte) contains the flash descriptor table and the Intel ME firmware. The smaller one (4MByte) is for the BIOS.
If in doubt look for the schematics of your device on the web or ask in a user forum.
Attach the Raspberry PI to the SPI Flash
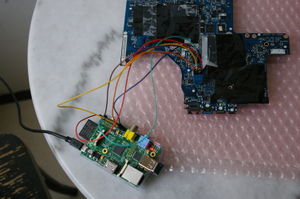
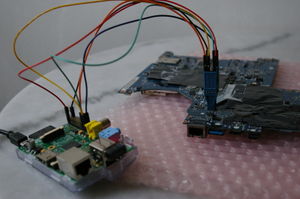
Try to find the datasheet of the SPI flash IC in the web to finger out the pins. In case of the S430 it is a Winbond W25Q32BV. You need to connect CS# (Pin 1 for the W25Q32BV, goes to CS0# on the Raspberry Pi), SO (Pin 2, MISO on RaspberryPi), GND (Pin 4), SI (Pin5, MOSI on Raspberry Pi), SCLK (Pin 6) and Vcc (Pin 8, 3.3V on RaspberryPi, connect before RaspberryPi is powered on!).
In case your notebook has two SPI flashs it may be necessary to connect CS# pin of the other flash to 3.3V from the RaspberryPi.
Double-check the connections.
Attach the Pomona Clip to the SPI flash which contains the BIOS and wire it to the SPI pins of the RaspberryPi. Connect Vcc (3.3V !) of the SPI flash as well, the Raspberry will power the IC during the session.
Poweron the RaspberryPi and connect the Linux PC to it.
In my case connecting Vcc of the flash to the RaspberryPi after the Pi was powered up resulted in some crashes, probably caused by the inrush current when the capacitors on the systemboard got charged.
If the RaspberryPi does not power up with the SPI flash connected to it, try to measure the current flowing into the flash. A RaspberryPi can only deliver 100-150mA on 3.3V. You may try an external power supply instead.
Flash Access
Transfer BIOS.BIN to the RaspberryPi, e.g. by scp.
All following commands are executed on the RaspberryPi.
- Check if the SPI flash IC is found by flashrom:
flashrom -p linux_spi:dev=/dev/spidev0.0
It should tell you that it has found a SPI flash device. If not, check if the Pomona clip is attached correctly. Power down the RaspberryPI, re-attach the clip and power the RaspPi on again.
- Backup the old content. This may take some minutes:
flashrom -p linux_spi:dev=/dev/spidev0.0 -r old_bios.bin
- You may need to tell the tool which flash IC it is with the "-c" option:
flashrom -p linux_spi:dev=/dev/spidev0.0 -c MX25L6405 -r t420_bios.bin
- Repeat the backup with another filename and compare the content of both files. If they don't match, do this a third time.
flashrom -p linux_spi:dev=/dev/spidev0.0 -r old_biosB.bin md5sum old_bios*.bin
- Write the new content (this usually includes a verify):
flashrom -p linux_spi:dev=/dev/spidev0.0 -w BIOS.BIN


